The post 10 Places to Visit in Japan (That Aren’t Tokyo) appeared first on The Blonde Abroad.
from The Blonde Abroad https://ift.tt/2YXkXUA

The post 10 Places to Visit in Japan (That Aren’t Tokyo) appeared first on The Blonde Abroad.
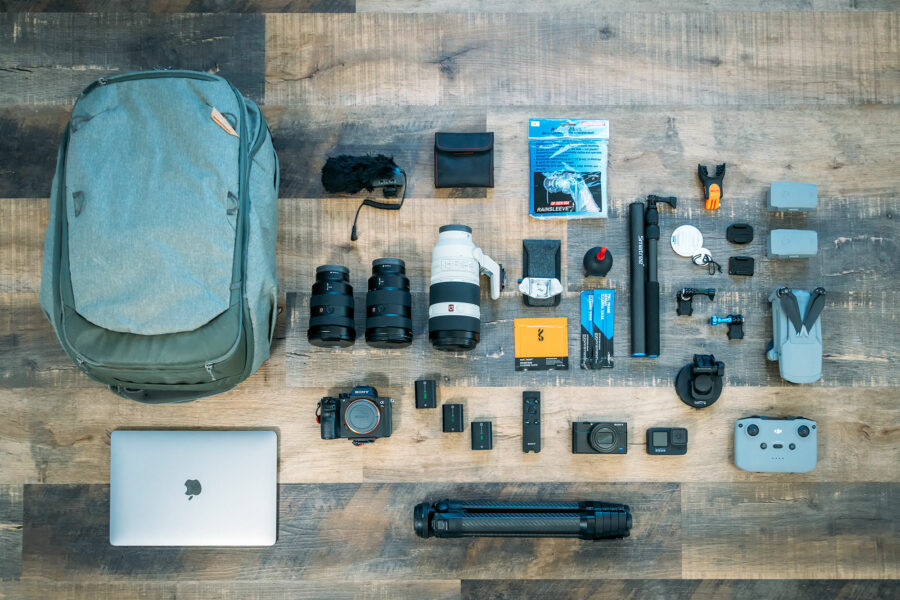
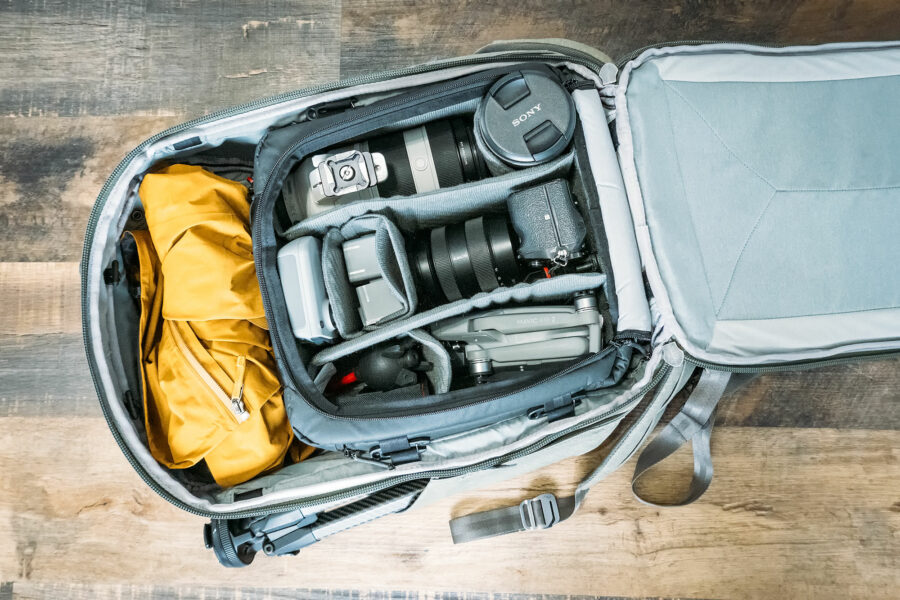
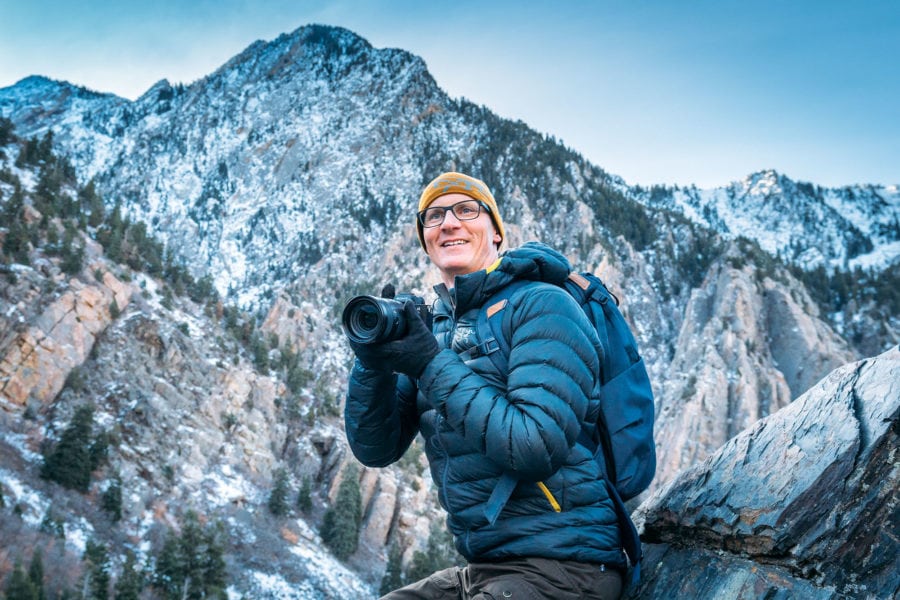
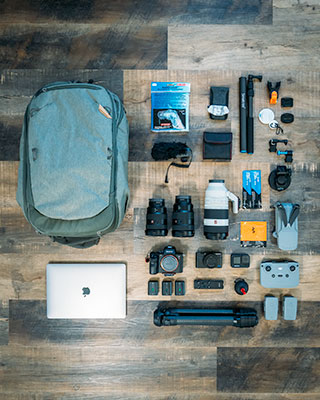
I’ve been working as a travel photographer & blogger for 10-years, so I get a lot of questions about what kind of photography gear I use. Take a peek inside my camera bag!
Now, when you’re reading this list, please understand that I’m a working professional freelance photographer. I own a lot of gear. Much more than I first started with.
Most travelers don’t need backup cameras, drones, and multiple lenses.
If you’re simply interested in a good portable camera for traveling, make sure to check out my complete guide to the best travel cameras for every budget.
I also share some photography gear recommendations for beginners at the end of this post, and you can check out my personal Amazon Shop to see all my photography & travel gear.
Keep in mind that I don’t pack absolutely everything on this list in my camera bag all the time, instead I pack according to each trip and shooting scenario.

I was a Canon fanboy for years and started my backpacking adventures back in 2010 with the Canon 7D. However, when Sony came out with their smaller (and superior) mirrorless A7 line, I made the switch.
Since then I’ve been using Sony cameras & lenses for the past 6-years.
Sony’s camera & sensor technology is often far ahead of competitors these days — in fact, even Nikon uses Sony sensors in their cameras!
The Sony A7R III is built for high-end landscape photography with a massive 42.4-megapixel full-frame sensor. This sensor is HUGE! But the camera body isn’t, which is pretty incredible.
Frankly, this is far too much camera for most travelers though.
If you are trying to save some money, another great option is picking up a used Sony A7 III or Sony A6600. Both are amazing.
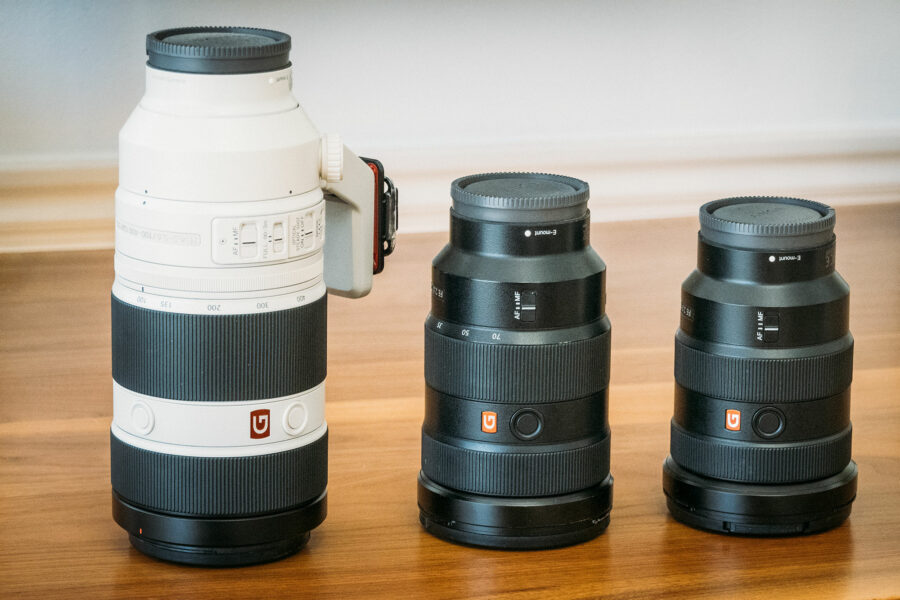
The 16-35mm F2.8 is the lens that’s on my camera 75% of the time. As a landscape photographer, I love shooting wide to capture as much of a big landscape as possible.
But you can also get decent portraits out of it zoomed in to 35mm and stopped down to F2.8. This lens works well for night and star photography too.
There is a less expensive version of this, the Sony 16-35mm F4 which is another decent option too.
Occasionally I need a little more reach. Or, I only have space for one lens (like on bigger hiking trips), and want the best of both worlds.
The 24-70mm F2.8 isn’t quite as wide, but often wide enough for most landscapes. With the added ability to zoom in to small subjects far away, or to compress the background making mountains “look” bigger.
This is also my go-to portrait lens for taking photos of people!
The 100-400mm F4.5 is my wildlife photography lens, outdoor portraits, or to compress big mountain ranges. I don’t use it that often, and don’t bring it along on every trip. If weight is an issue, it’s usually the first to be left behind.
But if I have a particular shot in mind that requires a telephoto, I’ll bring it.
By adding a Sony 1.4X teleconverter, I can increase the range to 560mm (which is nice for safari photography).
Want to improve your photography? Fancy gear is nice, but learning from other photographers is usually a better investment.
For a long time, I only traveled with one camera. But as I began getting hired for professional photography gigs, I realized that a backup camera was a wise investment.
The Sony RX100 is a tiny point & shoot pocket camera with professional features. It offers full manual control, and the ability to shoot in RAW format.
I also use it for shooting time-lapses, vlogging, and for certain situations where I don’t want to bring my large camera with me. Like sketchy parts of town, into bars/nightclubs, etc.
For most travelers, this would be a perfectly fine primary travel camera too! It’s super small, but super powerful. It even has a 200mm zoom for wildlife!
I’ve been using a GoPro since I started traveling ten years ago. I’ve owned almost all the models! Currently, I travel with the GoPro Hero 9.
GoPro cameras are great at capturing hands-free action or “b-roll” and you can attach them to almost anything. Plus, they are waterproof and shockproof!
I use my GoPro for surfing, mountain biking, hiking, snowboarding, snorkeling, scuba diving, cliff jumping, interior and exterior moving-vehicle footage, and more.
Just owning a GoPro is not enough to get great images and video. The magic of these cameras is in the multitude of accessories that are available for them!
The perfect tool for capturing aerial photography and video, while costing much less than renting a helicopter! Drones have really come a long way.
I couldn’t be happier with the DJI Mavic Air 2.
It flies super fast, is extremely reliable, and shoots high-quality RAW photos and 4K video. Not to mention it folds up crazy small!
The 360-degree sensors help stop you from running into things while flying, so you can concentrate on the shot. Active track and intelligent flight modes can do a lot of the work for you.
It took me a while to find a great camera backpack that I really loved, and I went through many different ones.
I finally found a winner in the Peak Design Travel Backpack. It holds everything I need it to, sits comfortably on my back, and has the perfect amount of weatherproofing and gear protection.
You can strap on a tripod, hiking poles, and other day-hiking gear. There’s a dedicated laptop pocket, room for a jacket and snacks, plus it opens from the back for easy access on the ground. It’s perfect to carry-on airplanes or walk around a city with my photo gear.
Now, it’s not really set up for long-distance trekking or overnight camping though. For that, I use a different setup.
This is a special lens pouch that’s large enough to keep a 100-400mm zoom lens safe & secure.
Or you can fit two smaller lenses in it (with a divider) or even a drone.
I use this specifically for long-distance trekking adventures, when I want to bring along an extra lens or my drone, but I also need to carry a regular hiking backpack filled with food, clothing, and camping gear.
It’s also handy for safely packing a camera lens in my suitcase, if my camera bag is going to be too heavy for some smaller airplane flights (specifically tropical islands!).
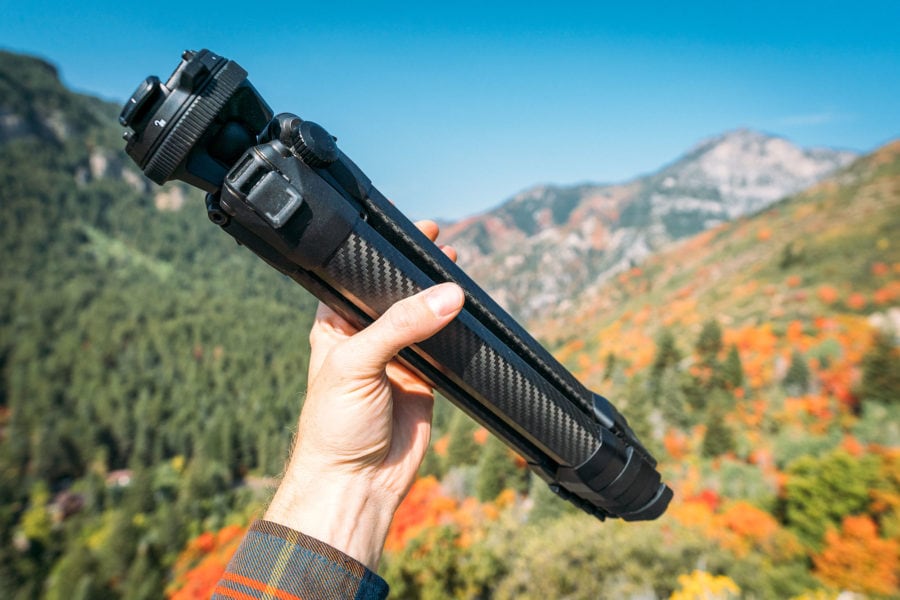
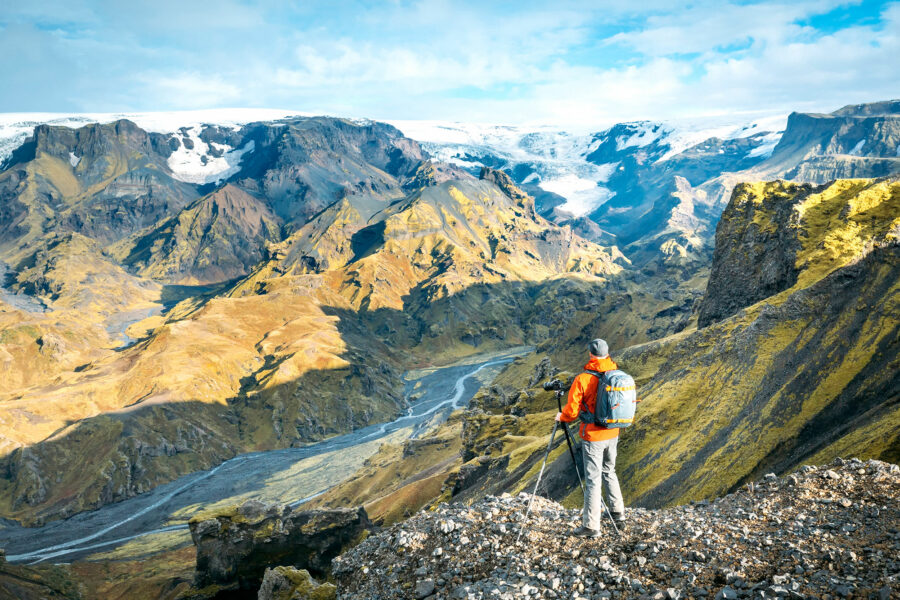
As a landscape photographer, a solid yet lightweight travel tripod is a key piece of my photography equipment.
I use my Peak Design Travel Tripod (full review here) to stabilize the camera in low light situations and with high f-stop settings (for maximum focus range). It allows me to get shots I just can’t achieve hand-held.
Sunsets, sunrises, the northern lights, star photography, and motion blurred waterfalls are just some of the situations where having a tripod is important.
I also use it to film myself for vlogs, as well as to shoot travel selfies when I’m hiking on my own. There are cheaper tripod options available, which I share in my guide to the best travel tripods.
I love this thing so much! Basically, the Peak Design Capture Clip allows you to “clip” your camera onto your belt, or on the shoulder straps of a backpack, for easy access (and to keep your hands free).
I use it constantly for day hikes, long distance trekking, walking around cities, and basically, anywhere I know I’ll want quick access to my camera. While I still use a camera strap sometimes, this is the primary way I carry my camera. You can even run with it!
HINT: If you have a larger camera, the Peak Design Pro Pad makes carrying it on your belt MUCH more comfortable.
When I’m not using my Peak Design camera clip mentioned above, I snap on this Peak Design Leash Camera Strap and sling it around my shoulders it like you’d wear a rifle.
The Peak Design system allows me to quickly remove the strap if it’s getting in the way, or snap it back on. Adjusting the strap length is also super fast. It’s pretty minimal and doesn’t take up much room in a bag.

So, if I’m carrying my camera on my backpack straps, what happens if it starts raining? While my Sony A7R III has decent weather sealing, in bad weather I throw on my Peak Design Shell Rain Cover. This helps protect my camera from the elements, while also keeping it ready to access.
Now if the rain or snow is REALLY coming down, or I’m shooting near the ocean (like in Antarctica), or maybe under a waterfall, I also pack a simple plastic rain sleeve like this.
For video, the internal microphones on cameras just aren’t very good. In fact, they’re pretty terrible. Because audio is SO important for creating a good video, I pack two different external microphones.
One is the Sennheiser MKE 400 Shotgun, which goes on the top of my camera. Great quality, and very small.
The other is the Tascam DR-TL Lavalier. This goes on my body, so I can get great audio even if the camera is far away, the room has a lot of echoes, or if it’s super windy out. You can than easily sync the audio to the video later while editing.
This tiny but powerful Aputure ALM9 LED Light mounts to the camera’s hot-shoe and allows me to shoot video at night. It takes up almost no space and can be recharged via USB cable.
Lens filters help you achieve certain photography effects that just aren’t possible with software yet. Think of them as sunglasses for your camera.
I carry a Hoya Fusion One Polarizing Filter to help reduce glare & reflections on water, glass (like through helicopter windows), and to darken up the blues and clouds in a sky.
I also carry a Tiffen Variable ND Filter (neutral density) which cuts down the amount of light going into the camera to different degrees, depending on how much you spin it. Why? To create special effects like motion blur in a waterfall, even when it’s sunny outside.
One of my favorite pieces of gear is the Sony Bluetooth Remote. This allows me to shoot photos or video remotely, when I’m away from my camera.
I used to own a wireless radio intervalometer remote, but newer Sony cameras have the time-lapse function built into their camera software (FINALLY!), so it is no longer needed.
However I do still like to shoot photos of myself, or group photos, with the ability to auto-focus, and this Bluetooth remote does that perfectly without any special camera attachments!
Because I shoot in RAW, with very large camera files, I use very fast memory cards. I own a mixture of Sony High-Performance 64GB and ScanDisk Extreme Pro 64GB class 10 cards which read/write at around 300 mb/s.
There is nothing worse than running out of battery power during an epic photography moment! That’s why I always carry spare batteries for my cameras.
I own 4 batteries for my Sony A7R III, 2 batteries for my Sony RX100, 3 batteries for my drone, and 3 batteries for my GoPro.

I travel with an Apple Macbook Air 13″ with a 2TB SDD, which is usually plenty of room for the images & video I shoot on any given trip.
To back that up, I also pack a super small 2TB Scandisk Extreme Portable SSD. Once I get back “home”, I move everything over to a larger desktop RAID system.
I bought a cold-weather jacket for my camera last year, for a few winter projects I was working on. Camping on the ice in Manitoba, and snowmobiling through the Russian wilderness.
It keeps your camera, batteries, lens, and your hands nice and toasty while shooting outdoors in below-zero temperatures. It’s a bit of a specialty product, and only comes out for certain conditions.
I own a few Think Tank Camera Accessory Pouches to keep all my cables, battery chargers, and GoPro Accessories organized. The clear sides allow me to quickly figure out what’s inside.
There’s nothing worse than a foggy or smudged camera lens! I pack no less than 3 of these K&F Concept Microfiber Lens Cloths on every trip. Two go in my camera bag, one goes in my pocket for easy access.
I always end up losing them too, so it never hurts to have more than you need laying around.
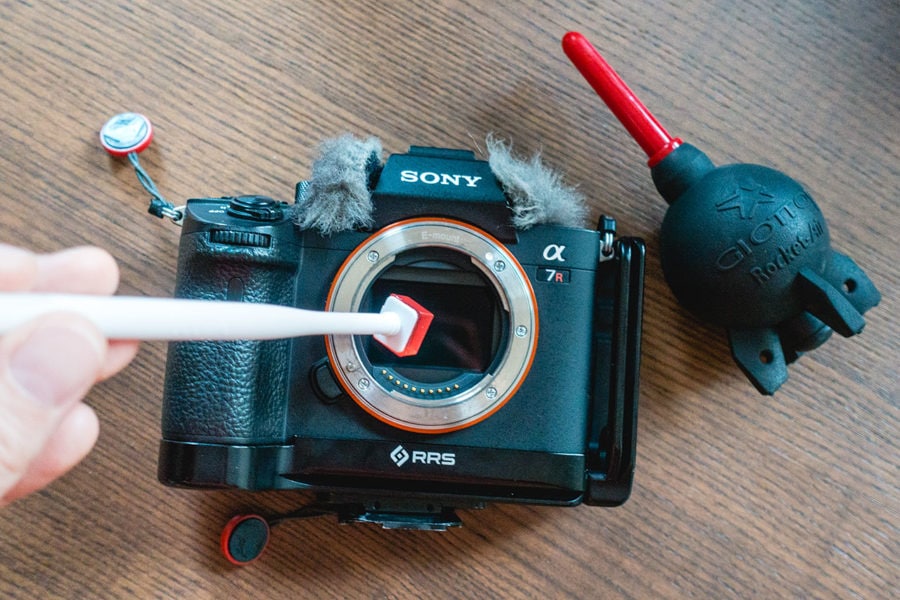
The problem with changing your lenses on mirrorless cameras is that the mirror is exposed to the elements, and they’re a magnet for dust. Dust on your sensor leaves you with “dust spots” on your photos (or worse, video).
A few quick bursts of air with this Camera Air Blower on your sensor can help clear that dust away.
When the air blower doesn’t work, and the dust on my sensor is too stubborn to blow away, I break out the big guns, my Eyelead Sensor Stick. It’s kind of like a gummy bear on a stick that pulls the dust away.
Yes, I own a lot of camera gear now. But that wasn’t always the case.
When I first started traveling, all I used was a Canon 7D, a wide angle zoom lens, a tripod, and a GoPro.
If you are still new to travel and adventure photography, don’t get discouraged by this giant list of gear-porn that I’ve accumulated over the years!
I do this professionally, so I can afford to go a little crazy.
For those of you traveling on a tighter budget, I’ve put together my ideal “starter travel photography kits” below — which won’t cost you an arm and a leg.
Ok! That was a big post. But people kept asking about my gear, so there you go.
However please remember that gear isn’t everything.
The best way to improve your travel photography is to practice as much as possible and learn new skills.
Even after ten years doing this, I’m still learning new techniques to get better.
Joining some online photography classes can really help you improve your images, as well as learn about the business side of photography.
Finally, check out my top travel photography tips for beginners too! ★

I hope you enjoyed my travel photography gear guide! Hopefully you found it useful. Here are a few more wanderlust-inducing articles that I recommend you read next:
Have any questions about my travel photography gear? What do you pack in your camera bag? Drop me a message in the comments below!
This is a post from The Expert Vagabond adventure blog.
The post The Best Photo Locations on Santorini appeared first on The Blonde Abroad.
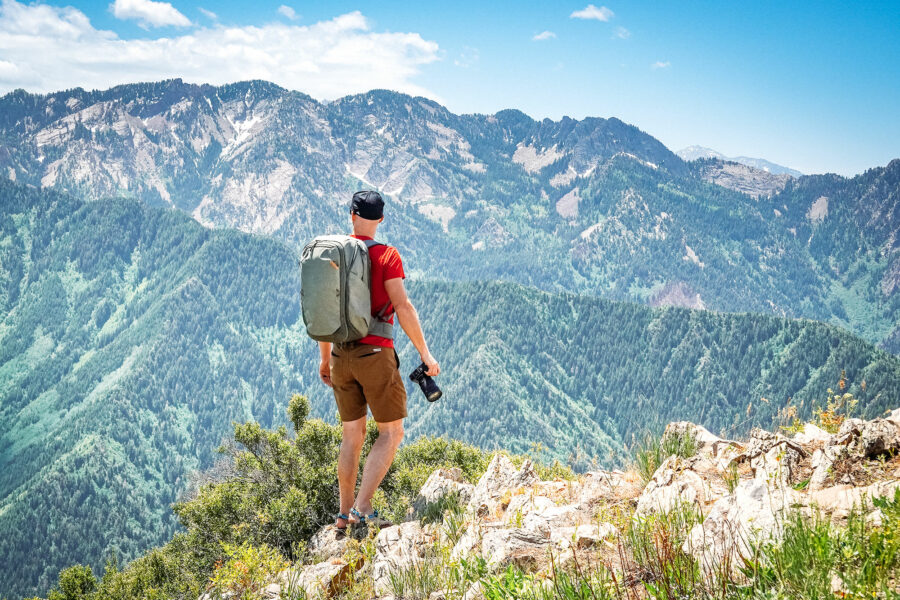
As a professional travel photographer, I get a lot of questions about what’s the best camera backpack for hauling your photo gear around. These are my favorites, and why.
Let’s be honest. Most tourists these days take photos with their smartphones, or maybe a compact travel camera. They don’t need a dedicated camera bag.
But what if you travel internationally with a ton of photography equipment like me? Or take your gear hiking?
Multiple cameras, lenses, a drone, etc. Maybe photography is your passion, or you run a YouTube channel, or work as a professional photographer?
You probably want a specialty photography backpack to pack that expensive gear safely and securely. I prefer traveling with a dedicated carry-on friendly camera backpack, and have spent the last few years trying out all kinds of different camera bags.
But what’s the best camera backpack for storing and traveling with your photo gear?
There’s no easy answer to this question. Different people will have different requirements and budgets for choosing a good camera backpack.
My goal with this camera backpack buyers guide is to help you narrow down the overwhelming choices — and pick the perfect camera backpack so you’re prepared for your next trip.
Here’s everything we’re going to cover (feel free to click to a specific section if you want to skip around).
WEIGHT – Obviously you want the lightest camera backpack you can find that’s also comfortable, because this will save your body from fatigue. The materials a backpack is made of can also affect its weight, and super light-weight fabrics can increase the price.
SIZE & CAPACITY – Backpack sizes are usually quoted in liters of volume they can hold. Generally, camera backpacks are going to run between 20-40 liters. However some adventure camera backpacks are designed to carry hiking & camping gear too, and can run 45-60 liters.
GEAR PROTECTION – The whole purpose of a specialized camera backpack over a regular bag is to help protect your expensive gear, while making it easily accessible too. Some bags go over the top with too much padding which adds to the overall weight.
SIDE/REAR LOADING – Camera backpacks are usually rear-loading, meaning you need unzip a panel on the back of the bag to access your photo gear. Some camera bags also offer side entry, so you can pull your camera out without taking off your backpack.
STRAP TYPES – A padded waist strap distributes the weight of your backpack on your core, instead of just your shoulders. This helps avoid sore shoulders and back pain, especially when wearing it for long periods of time. Especially handy for camera backpacks.
GEAR POCKETS – This is subjective, and everyone is different, but I prefer a minimal amount of pockets on my camera backpack. Some important ones include a quick-access pocket for things like keys, passport, sunglasses, etc. I also love when there’s a laptop pocket, and one for my filtered water bottle.
ZIPPERS – I prefer large, easy to use zippers on a backpack. Bonus points if they’re lockable zippers, specifically designed to be secured with a small luggage lock.
PROPER FIT – You could have the best travel backpack available, but if it doesn’t fit right, you’ll be miserable. Your torso length is more important than your height. Here’s a great backpack fitting guide.
LOOKS – Some camera backpacks are built to look like normal backpacks, others scream “there’s an expensive camera in here!”. I prefer a more subtle & minimalist look, but it’s ultimately up to you how important looks are.
WEATHER RESISTANCE – The material a backpack is made of can determine how weather-resistant it is. Some backpacks need a special rain-cover, others have rain-resistance built right in. You don’t want your gear getting wet!
CARRY-ON FRIENDLY – Airlines are getting stricter about the size and weight of your carry-on bag. As a general rule, I wouldn’t try to bring anything larger than a 40L camera backpack for carry-on luggage to be safe.
Want to improve your photography? Learning from other photographers is the fastest way.
When choosing a camera backpack, it’s important to have a general idea about how you plan to use it. Generally, I split photographers up into some different categories.
If you don’t lug a ton of photo equipment around, a small discreet camera backpack that you can carry-on an airplane and walk around a city with will do just fine. However, if you’re a professional photographer with lot of camera gear, or go on overnight treks with a lot of hiking & camping gear — you might want a larger adventure-style camera backpack.
Most typical travel photographers are going to want to keep their camera equipment on the plane with them in a camera backpack that’s not too big, and will look good when walking around the streets of Paris or Rome. They might embark on the occasional day hike too, but won’t need to fit camping gear inside their bag.
Adventure photographers spend a lot of time shooting in the mountains, deserts, and jungles. Maybe they prefer visiting more remote destinations, and need space in their bag for a sleeping bag and tent. They pack their own multi-day backpacking and camping equipment to survive outside in the backcountry.
The camera backpack you choose from the guide below will depend on what kind of photographer you are (or think you’re going to be).
Weight: 4.5 LBS (2 KG)
Capacity: 30-45 Liters
Load Range: 20-40 LBS
Colors: Black, Sage
Best For: Travel & Day Hiking
Price: Click Here For Latest Price
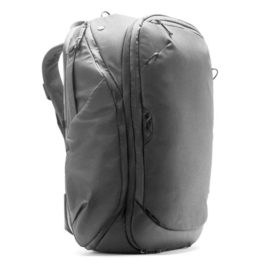
The best designed camera backpack I’ve tested so far, the Peak Design Travel Backpack has loads of space, makes it easy to access your gear, and the quality is fantastic. It was designed as a carry-on travel bag, but works amazing well as a camera backpack too when paired with camera-specific packing cubes (which come in different sizes).
You can adjust the size of the bag from 30L to 45L depending on your travel needs. Backpack straps can all be hidden super fast, which is awesome. Accessing your photo gear is super easy and fast, it’s comfortable to carry, and it protects your equipment while traveling or hiking. There’s a dedicated laptop pocket too.
EDITOR’S NOTE: One of many camera backpacks I own, but I end up bringing this one with me 75% of the time when traveling or going on a day-hikes with my gear. Comfortable, minimal, stylish, and easy to access all my equipment.
Weight: 4.65 LBS (2.1 KG)
Capacity: 22-30 Liters
Load Range: 20-40 LBS
Colors: Black, Grey, Blue
Best For: Travel & Day Hiking
Price: Click Here For Latest Price

The Peak Design Everyday Backpack is a popular walk-around camera bag that’s great for lugging your camera equipment around cities, for day hikes, or as a carry-on camera backpack. The material looks great but is pretty weather resistant too.
It has three points of entry into the bag. From the top, as well as two side flaps for easy access to your camera gear without needing to remove the backpack completely. The MagLatch system leaves part of the bag open on the sides, because there’s no drawstring closure.
Weight: 5.75 LBS (? KG)
Capacity: 35-42 Liters
Load Range: 20-40 LBS
Colors: Black
Best For: Travel & Day Hiking
Price: Click Here For Latest Price

The Peter McKinnon Camera Pack from Nomatic is the perfect bag for every adventure. It allows you to pack camera gear and clothing in the same bag. With removable folding dividers, expansion, and external carry straps it allows you to pack it any way you want.
Weight: 5.6 LBS (2.5 KG)
Capacity: 30 Liters
Load Range: 30-40 LBS
Colors: Grey
Best For: Outdoor Adventure Photography
Price: Click Here For Latest Price

The LowePro Whistler 350 has been my favorite travel camera backpack for years now! The special TPU coating can take a lot of abuse from the elements, and a large easy-to-use zipper allows you to open the camera compartment quickly, even with gloves on. The newer versions have a laptop pocket too.
It holds a deceptively large amount of gear, and I regularly carry it on airplanes loaded down with 30-40 lbs (don’t tell the airlines!). There’s a large front pocket to pack your lunch, a jacket, or even avalanche equipment. External gear straps can hold snowshoes, a snowboard, skis, your tripod, or anything you need.
LowePro also makes a larger 450 model, but it’s too big for airline carry-on.
Weight: 2.2 LBS (1 KG)
Capacity: 45 Liters
Load Range: 30-50 LBS
Colors: Black, Blue
Best For: Outdoor Adventure Photography
Price: Click Here For Latest Price

From day hikes to overnights, the Strohl Mountain Light Backpack was designed by professional photographer Alex Strohl to be lightweight and nimble. Constructed using rugged custom materials, taped seams, and thoughtful external storage.
The backpack is weatherproof and adaptable to any type of mission you can think of. Quick Back panel access and a compact camera unit allow easy camera carry and fast access. It’s also the lightest camera backpack in this guide!
Weight: 3.75 LBS (1.7 KG)
Capacity: 40 Liters
Load Range: 30-50 LBS
Colors: Black, Green, Orange
Best For: Outdoor Adventure Photography
Price: Click Here For Latest Price

The rugged and weather proof F-Stop Anja Backpack was created for adventure photographers who need to pack hiking & camping gear along with their photo gear. At 40-liters it’s still airline carry-on approved for most airlines too.
It has an internal aluminum frame for support, waist belt, and comfortable shoulder straps. It comes with a Slope Medium ICU for holding a professional DSLR with an attached lens & other gear. However there are other ICU sizes available depending on the amount of gear you need to carry.
Its outer shell is fully water resistant, features plenty of small pockets for extra storage and it is hydration system compatible. There’s also a 13″ laptop compartment, quick-access top pocket, and plenty of attachment points for adventure gear like skis or ice axes.
Take a peek inside my camera bag to learn what I pack with me on my travel photography adventures around the world.
Well, I hope you learned a little bit more about the different kind of travel cameras available, and are able to choose one that fits your budget and needs.
Happy travels, and let me know which camera model you decide to pick for your next vacation! ★

I hope you enjoyed my guide to the best camera backpacks of 2021! Hopefully you found it useful. Here are a few more photography articles that I recommend you read next:
Have any questions about the best camera backpacks? What about other suggestions? Drop me a message in the comments below!
This is a post from The Expert Vagabond adventure blog.
The post 10 Places to Visit in Portugal (That Aren’t Lisbon) appeared first on The Blonde Abroad.
The post The Ultimate Mallorca Itinerary appeared first on The Blonde Abroad.
The post The Ultimate Guide to Valldemossa, Mallorca appeared first on The Blonde Abroad.